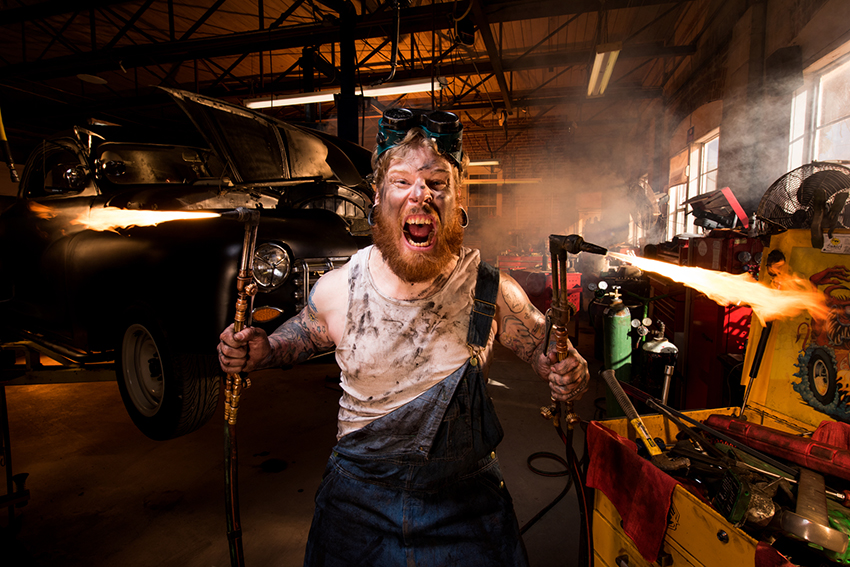
Maybe I read too many Johnny Torch comics when I was a kid. But I always wanted to try a shot like this, with two oxy-acetelyne torches wielded by a wild man mechanic in a fantastical, down home garage. Would have been much harder a number of years ago, but with the technology we have now, with radio controlled strobes and the resolution of a Nikon D810, which this was shot on, it’s, well, I won’t say it’s easy, but it sure is fun.
It’s more than fun, actually. It’s a frikkin’ laugh riot when you finally get to make a picture out of a long held piece of visual flotsam sloshing in the turbulent sea of your imagination. I write proposals like crazy, trying not to sound like a photographic version of the Unabomber, shivering in a sparse shack in the wilderness, penning wild notions. And, like a notes in a bottle, set adrift upon the tides, these missives mostly sink, or wash up unnoticed on some distant shore, along with the rusted license plates, the hospital syringes, and the occasional busted propeller. Most actually deserve this fate. But this one actually got to a safe harbor.
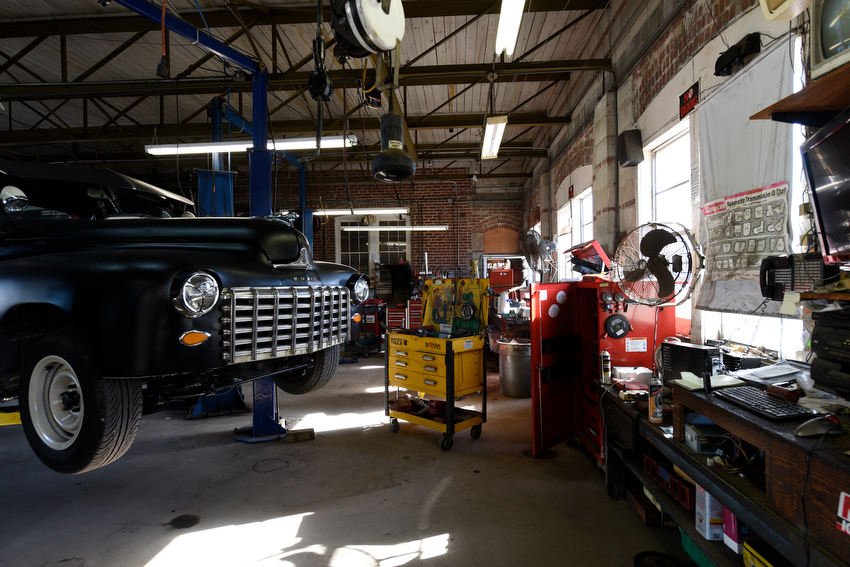
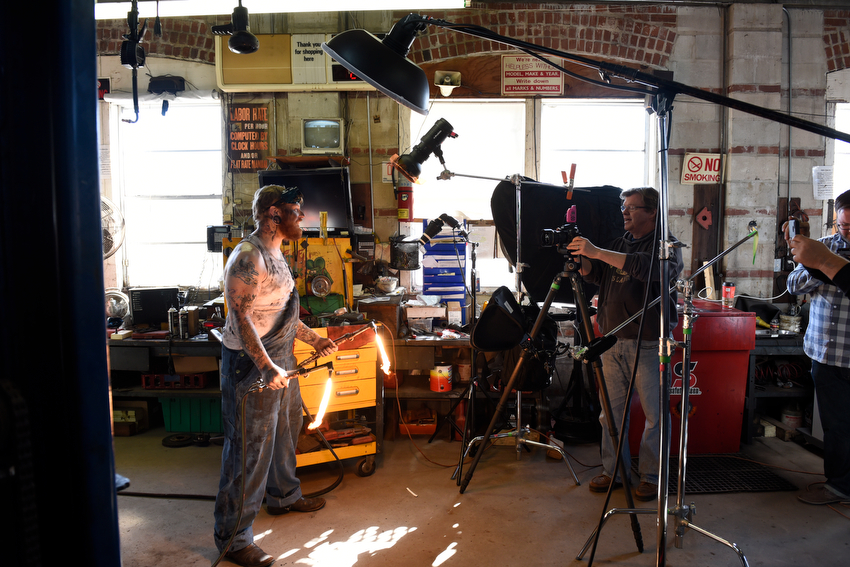
So, thanks to Brad Moore, we found this wonderful garage in Tarpon Springs, the Sunset Auto Center. Pretty, as garages go. Kinda classic. Big windows, and lifts. In other words, perfect for a picture. Also, thanks to Brett Smitley, our over-the-top fireball of a mechanic.
Let’s go through it, bullet point by bullet point.
1) Spike the camera. Find your angle. I didn’t have move around journalism in mind. I had one spot I had to find to light up this enthusiastic mechanic who obviously approaches his job with gusto. This type of job, it’s tripod all the way, which for me, means Gitzo. This one, I believe was a GT 5542 LS. And of course, the aforementioned D810, fitted with a 14-24mm f2.8.

2) Make an available light exposure. See where the light lurks and the shadows creep. See what you have to do to spark this scene.
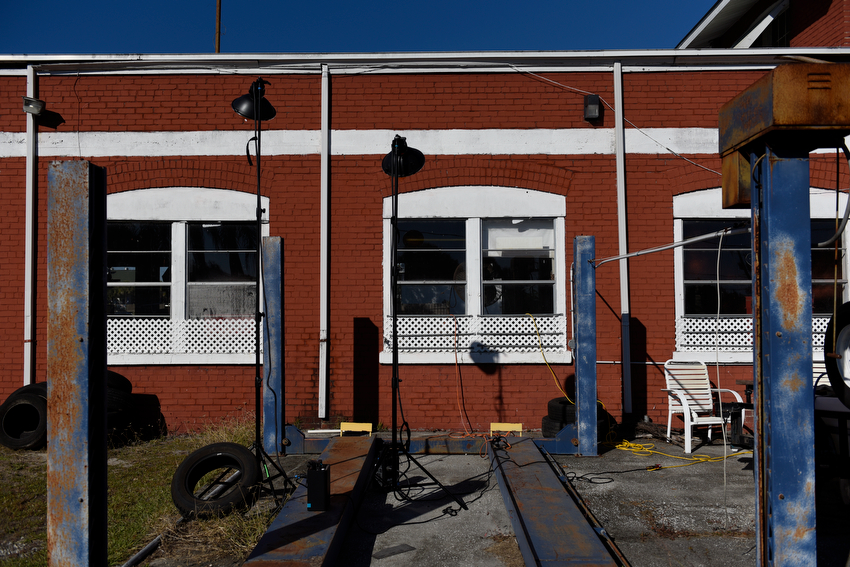
3) Build the light. The main light for the garage is obviously the window light, but I wanted to directionalize and maximize it, so I put two 2400ws Profoto Acutes outside the establishment, firing into the windows.
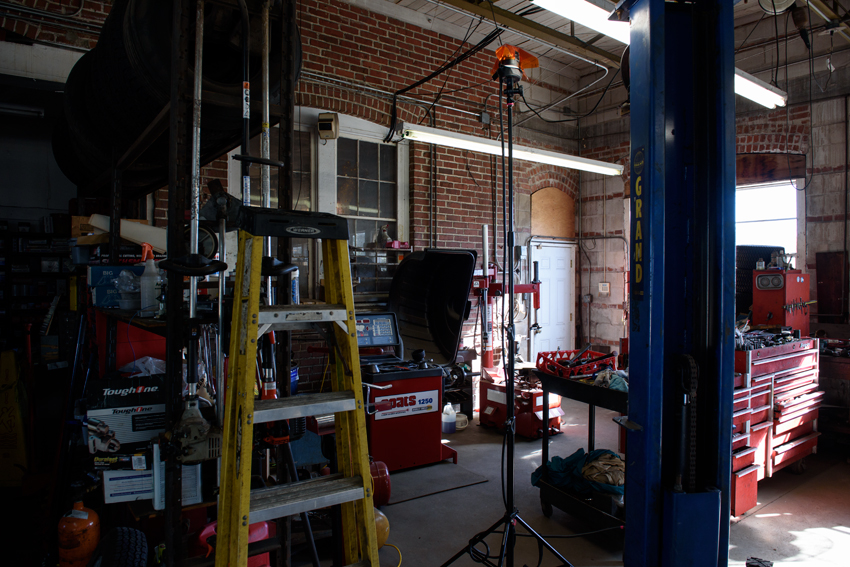
3) Curse the darkness in the background and light it up with a CTO gelled Profoto B4, bounced at a moderate power into the ceiling.
4) Play the angles. The car in question is dark, so place a somewhat broad source somewhat indiscriminately off to camera left. (Precise, huh? Kinda, sorta, put it off to the left there and see what happens. Very typical location language.) It is an umbrella, mostly used because it was the last light source placed and that particular shaper was all I had left to use. But it does its job. It produces an angle-of-incidence-angle-of-reflection highlight off the dark, near side of the car. It is also powered by a Profoto B4.
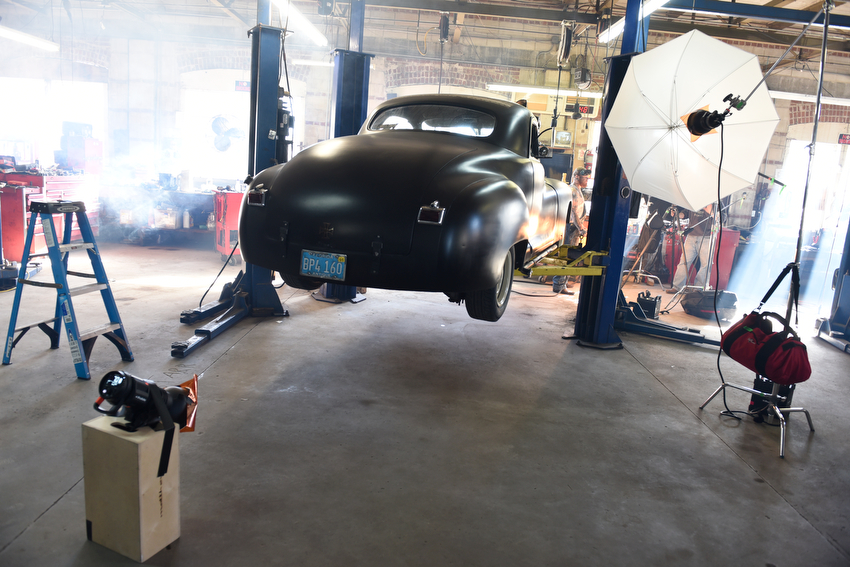
5) I’m floored by the lack of detail under the car. So I put a light there. Whacked it into the concrete, low-ish power, just to create a separating highlight. It, too, is gelled warm. This is a Profoto B1, which, at 500ws had plenty of juice to throw a sheen of separation onto the dark floor.
6) Speedlights to the rescue. Small source, inside the interior of the car. And the engine block. Bounce them up into some surface the camera can see, just to create detail. Also warm gelled. Also put an SB-910 into a Lastolite Speedlight box, low, in front of the subject, very weak power-wise, just to fill and spark the eyes.
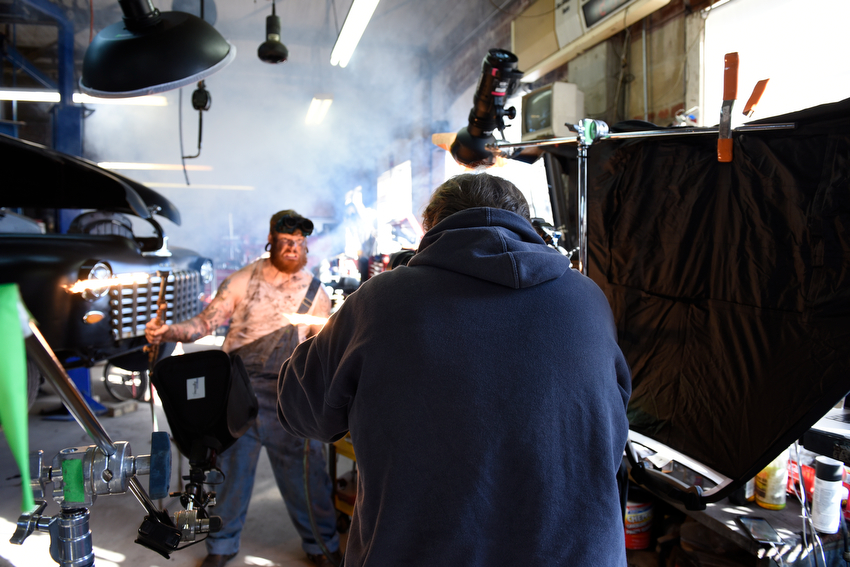
7) Ahh, the subject. Perhaps not the obvious candidate for a beauty dish, but that’s what we used. Fitted it with a diffuser sock and a grid to control spill.
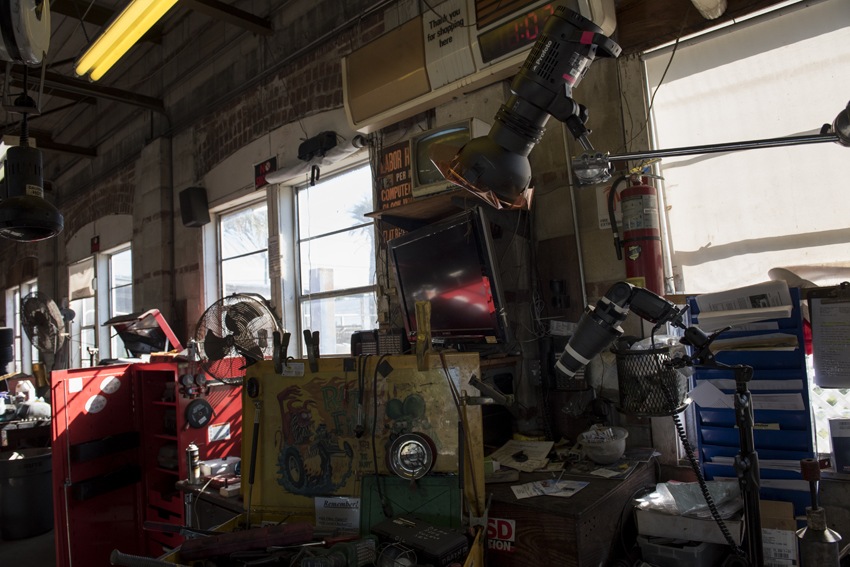
8) The tool chest needs light. Easily done with one-two punch of a Profoto B1 fitted with a grid, and a SB-910 Speedlight, fitted with a Flashpoint snooted grid. Both are warmed up, of course.
Camera settings…. Nikon D810, Nikkor 14-24mm wide angle zoom lens, set at 1/200th of a second at f11.
Lunatic sketch below….rough placements of lighting of a picture basically done for fun.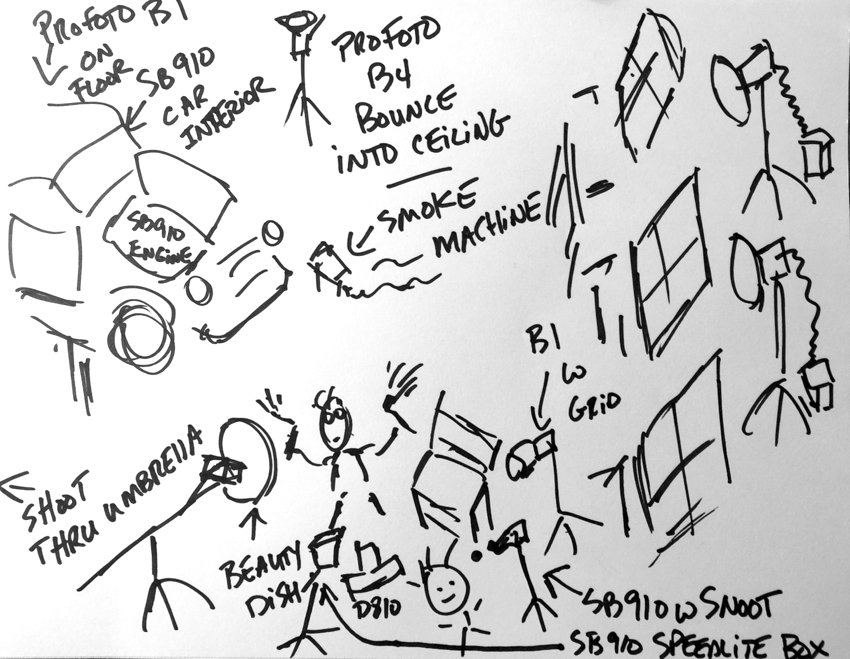
Then, with a little bit of smoke in the background, an energetic model, two fiery torches, it’s all over but the shouting and the flames.
More tk…..


Great shot! It’s wonderful to see all the details that you’ve seen before the shot! Congrats!
Thanks so much for sharing your knowledge
Yet another amazingly hot environmental portrait!
Thank you for the behind the scene saga of building this…
And just for fun, did I count accurately… 11 lights, not even counting the 2 oxy-acetelyne torches?! LOL.
Everytime, everytime I think I am catching up to Joe in lighting and pulling off a photographic concept, he pulls off a shot like this and makes me realize how far I still have to go.
A true artist in so many ways…love the sketch!
Really great (technical) and fun image! I love youre work and explanation with the behind the scene images and lighning scheme! even with this info it is almost impossible for us amateurs to pull this off! keep it up!!
Another great and inspirational behind the scenes. You break down the elements and the build in a way that makes it seem possible for everyone and isn’t that the heart of the post? First the idea, then evaluate, solve the problems, add energy and ….!
Really awesome image! Lighting is fantastic, love the atmosphere of the shot. Awesome location and love the mechanic, he would have been fun to work with.
This really is amazing. How much time do you suppose you have invested from the time you drove up till you got the shot? Really good stuff Joe. Thanks for sharing.
hey Craig…prob took us 4-5 hours to get fully ready….
Joe – love the step-by-step recipe, always the same fundamentals, with the devil in the details. Thanks for providing the 4-5 hour timeframe – for a master… makes us realize just how much effort and caring goes into your work. And thanks for Stunning picture, absolutely love it!
In the final shot, how much work was done post to change things?
thanks for the post is really good
http://www.kerkinstore.es
Not that much really….some basic darkroom work to sharpen and contrast things up a bit. I might do a blog upcoming where I compare orig and the final…..Joe
Dude. Looking at your lighting diagram makes my hair hurt! (Sweet pic!)
You sir is an inspiration to us all.
So in this recipe if you don’t have a smoke machine would oily rags be a good substitute? It might also accomplish the light needs under the car. Some of us are on a tighter budget than you are unfortunately. Smoke color might be a bit off though. Probably harder to control on a 4 hour shoot not to mention the ventilation requirements. The other alternative is of course pan frying which of course smells wonderful, good smoke but is only viable for a short duration but it does mean you will get fed after the shoot so there’s that upside. My neighbor smokes big cigars so maybe thats another option. I can’t stand the smell of incense so I had to discount that option early on. Our weber grill does give off a nice plume with a good rack of ribs and damn it smells good. Might be distracting. Any thoughts?
For some reason my wife is looking at me in horror at this knowing that I’m planning a shoot of my son who’s a flame worker.
Hi Charlie….oily rags would be hard to directionalize, I think. The resulting smoke could leave a film on surfaces everywhere and actually ruin things. You know, you can get a Roscoe smoke machine at a Party USA store, either for purchase or rental for dirt cheap. They trot them out every Halloween. Best, Joe
This is an amazing shot. I never realised how much prep goes into a photo. Thanks!
In a shop environment you get a fair amount of airborne dust. Dust seems to sparkle more than smoke when hit with light. Do you prefer smoke as its more muted or is it just easier to directionalize?
Smoke is preferable, at least for me. I can directionalize it to a degree, and I often use a hazer, instead of a smoke machine. It puts out a thin, manageable degree of fog that just gives the light texture and shape. Joe
Nice article. Didactic.
Great pic Joe,
I have a question. Could you have used a softbox with a grid instead of a beauty dish fitted with a sock and grid? Wouldn’t that have given the same effect/result?
Regards,
Sebastian
Hi Sebastian, yes, I could have. The softbox most likely would have spread a bit more and had a little less snap to the quality of the light. Small things, but the beauty dish in this instance was my gut call….best, Joe